
If your LiftMaster remote 893LM isn’t working like it used to, you’re probably feeling frustrated. You rely on that remote every day to open and close your garage door effortlessly.
The good news? Resetting your remote is easier than you think, and it can quickly bring back that smooth control you miss. In this guide, you’ll learn simple, step-by-step instructions to reset your LiftMaster remote 893LM, so you can get back to using it without any hassle.
Keep reading—by the end, you’ll have your remote working perfectly again.
Credit: www.amazon.com
Preparing For Reset
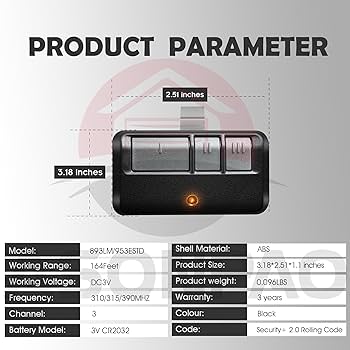
Start by gathering your LiftMaster 893LM remote and the garage door opener. Make sure the remote has fresh batteries. Clear the area to avoid interruptions during the reset process.
Gathering Required Tools
Before resetting your LiftMaster remote 893LM, gather all needed tools. This helps avoid interruptions during the process. Usually, you need a ladder and a small flat-head screwdriver. A step ladder makes reaching the garage door opener easier. The screwdriver helps press small buttons on the opener. Keep the remote close for quick access. Having everything ready saves time and frustration.
Locating The Garage Door Opener
Find your garage door opener unit first. It is usually mounted on the ceiling inside your garage. Look for a box with buttons and a light. This unit controls your garage door. Sometimes the model number is on a label on the opener. Knowing where it is helps access the reset button fast. Clear the area under the opener for safety. This step prepares you for the next reset stage.

Credit: www.reddit.com
Resetting The Liftmaster Remote 893lm
Resetting the Liftmaster Remote 893Lm is a simple process that helps fix connection problems. It clears old codes and lets you add new ones. This step is important if the remote stops working or if you want to connect it to a new garage door opener. Follow the steps carefully for a smooth reset.
Erasing Previous Codes
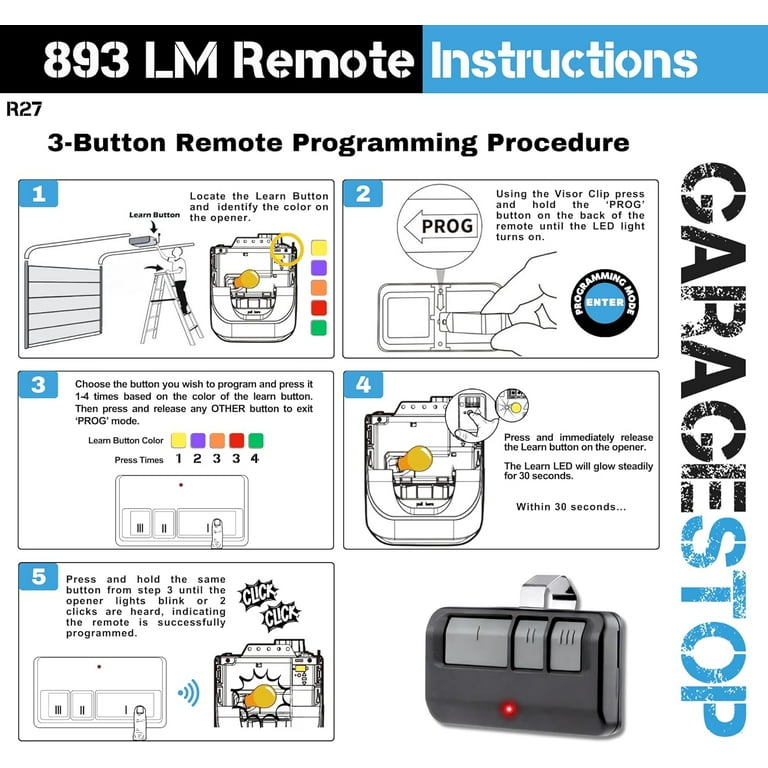
Start by pressing and holding the button on the remote. Keep it pressed for about 20 seconds until the light blinks. The blinking light means the old codes are erased. This clears all previous settings and prepares the remote for new programming.
Programming New Codes
To add new codes, press the button on the remote once. Next, go to your garage door opener’s “Learn” button. Press the “Learn” button quickly. Return to the remote and press the button you want to program. The light on the remote will blink or stay on. This shows the new code is saved. Test the remote to confirm it works with your garage door.
Testing The Remote
Testing the LiftMaster Remote 893LM is important after resetting it. This step ensures the remote works properly with your garage door opener. You can catch any problems early and fix them quickly. Follow simple steps to check if the remote responds as expected.
Checking Remote Functionality
Press the button on your remote control. Listen for a beep or watch the garage door. If the door moves, the remote is working. Try pressing the button from different distances. This checks the remote’s signal strength. Make sure the remote battery is fresh. A weak battery can stop the remote from working right.
Troubleshooting Common Issues
If the door does not open, check the battery again. Replace it with a new one if needed. Make sure the remote is programmed correctly. Sometimes, resetting can erase the settings. Try reprogramming the remote following the manual. Check if the garage door sensor is blocking the signal. Clear any objects in the way. Test the remote near the door to avoid signal problems.
Maintaining Your Remote
Maintaining your LiftMaster remote 893LM helps it work well for a long time. A well-kept remote means fewer problems and smooth operation. Simple care steps can protect your device from damage and wear.
Battery Replacement Tips
Check your remote’s battery often. Weak batteries cause poor signal and slow response. Use the correct battery type for the 893LM remote. Remove the back cover gently to avoid damage. Replace old batteries with fresh ones quickly. Dispose of old batteries safely to protect the environment. Test the remote after changing the battery to ensure it works well.
Keeping Remote Clean And Safe
Keep the remote dry and away from dirt. Use a soft cloth to clean the surface regularly. Avoid harsh chemicals that can harm buttons or plastic. Store the remote in a safe place to prevent drops or spills. Do not expose it to extreme heat or cold. Regular cleaning and safe storage keep the remote in good shape and extend its life.
Credit: www.walmart.com
Frequently Asked Questions
How Do I Reset A Liftmaster Remote 893lm?
Press and hold the remote’s button until the LED blinks twice. Release to reset.
Can Resetting Fix A Non-working 893lm Remote?
Yes, resetting can clear errors and restore remote function quickly.
How Long Does It Take To Reset The 893lm Remote?
The reset process usually takes about 10 seconds or less.
Do I Need To Reprogram After Resetting The 893lm Remote?
Yes, reprogramming is needed to sync the remote with your garage door opener.
What If The 893lm Remote Doesn’t Reset Properly?
Try replacing the battery or repeat the reset steps carefully.
Conclusion
Resetting your LiftMaster remote 893LM is simple and quick. Follow the steps carefully for best results. Keep your remote working smoothly by resetting it when needed. This helps fix common issues without extra cost. Remember to test the remote after resetting.
You can enjoy hassle-free garage door control again. Small problems don’t need big repairs. Stay confident handling your remote with these easy tips.