
Want to add some flair to your hair without a salon visit? DIY hair highlights at home without foil can be easy and fun.
Highlighting your hair at home can save you time and money. You don’t always need foil to get beautiful, natural-looking highlights. There are simpler, less messy techniques you can try. This blog post will guide you through easy methods to highlight your hair.
You’ll learn how to achieve salon-quality highlights with items you already have at home. So, if you’re ready for a fresh look, keep reading. Let’s dive into the world of DIY hair highlights without foil!

Credit: www.tiktok.com
Introduction To At-home Hair Highlights
Ever found yourself staring longingly at a friend’s sun-kissed locks, wondering how you could achieve that same look without spending a small fortune? Believe it or not, you can get stunning highlights right at home – without using foil! That’s right, say goodbye to the salon and hello to a more natural, wallet-friendly approach. Let’s delve into the world of DIY hair highlights, and discover how you can get professional results in the comfort of your own bathroom.
Benefits Of Diy Highlights
Why should you consider doing your own highlights at home? Here are a few compelling reasons:
- Cost-effective: Salon visits can be expensive. Doing it yourself saves money.
- Convenient: No need to schedule appointments. Do it whenever you have time.
- Control: You decide how light or dark you want your highlights.
- Natural look: Without foil, highlights can blend more seamlessly with your hair.
Common Myths Debunked
There are quite a few misconceptions about DIY hair highlights. Let’s set the record straight:
- Myth 1: You need professional tools. You don’t. Many household items can help you achieve great highlights.
- Myth 2: It’s impossible to get good results. With patience and practice, you can achieve salon-worthy highlights.
- Myth 3: It’s very damaging. While any chemical process can cause some damage, using gentle products and proper care can minimize this.
- Myth 4: Only professionals can do it right. With the right technique and a bit of confidence, you can become your own hair stylist.
So, are you ready to grab your hairbrush and get started? Let’s break free from the myths and embrace the benefits of DIY hair highlights at home. Your perfect summer look is just a few steps away!
Essential Tools And Materials
Highlighting your hair at home can be a fun and rewarding experience. Before you start, gather all the necessary tools and materials. This ensures you achieve the best results. Below are the must-have supplies and tips on choosing the right hair dye.
Must-have Supplies
Having the right supplies makes the process smoother. Here are the essentials:
- Comb: A fine-tooth comb helps section your hair.
- Brush: An applicator brush for even dye application.
- Gloves: Protect your hands from dye stains.
- Bowl: A mixing bowl for your dye.
- Clips: Hair clips to keep sections separate.
- Old Towel: Use an old towel to cover your shoulders.
These tools will help you create precise highlights without using foil. Keep them handy for a stress-free experience.
Choosing The Right Hair Dye
Choosing the right hair dye is crucial. It affects the final look. Consider your natural hair color first. Pick a dye that complements it. Semi-permanent dyes are gentler on hair. Permanent dyes last longer but may cause damage.
Read the dye instructions carefully. Each brand may have different steps. Select a shade that enhances your natural beauty. Avoid drastic changes. Subtle highlights often look more natural.
Ensure you do a patch test. This checks for allergies. Follow the instructions for the best results. Highlighting your hair at home can be simple and fun with the right tools and dye.
Preparing Your Hair
Preparing your hair is a crucial first step in DIY hair highlights. Proper preparation ensures your highlights look even and vibrant. This section will guide you through essential steps to get your hair ready.
Hair Health Check
Before starting the highlighting process, check your hair’s health. Healthy hair absorbs color better and looks shinier. Look for signs of damage such as split ends or excessive dryness. If your hair is damaged, consider trimming the ends and using deep conditioning treatments. Healthy hair provides a good base for highlights.
Washing And Drying Tips
Wash your hair 24 hours before highlighting. This removes excess oil but allows natural oils to protect your scalp. Use a gentle shampoo free from sulfates. Avoid using conditioner as it can create a barrier for the color. After washing, let your hair dry naturally or use a low heat setting on your hairdryer. Ensure your hair is completely dry before starting the highlighting process.
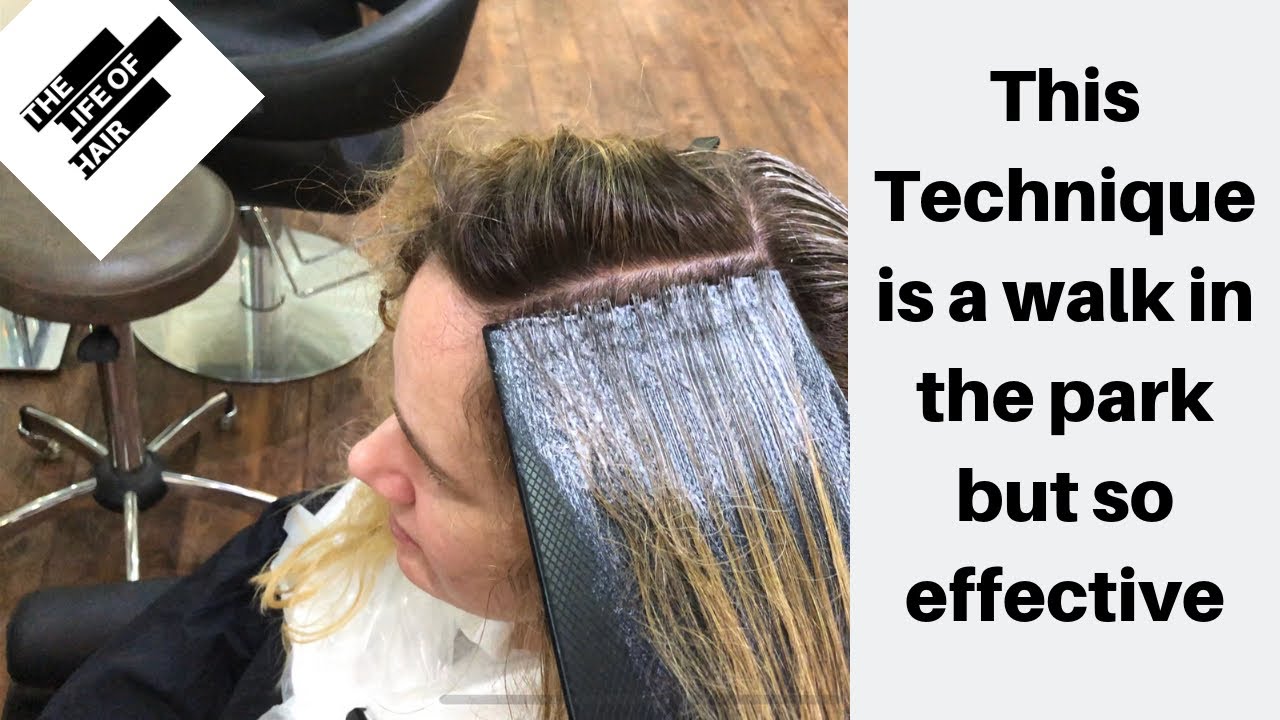
Hand-painting Technique
The hand-painting technique, also known as balayage, offers a natural way to highlight your hair. This method does not require the use of foil. It gives a sun-kissed look. The color blends smoothly with your natural hair. If you want to try this at home, follow the steps below.
Step-by-step Guide
First, gather your materials. You will need a highlighting brush, hair clips, and your chosen hair dye. Wear old clothes or use a cape to protect your skin and clothes.
Next, part your hair into sections. Clip each section to keep them separate. This helps in applying the dye evenly.
Now, dip the brush into the dye. Start painting the dye onto small sections of hair. Use a sweeping motion. Focus on the mid-lengths and ends of your hair.
Leave the dye on for the recommended time. Then, rinse your hair thoroughly. Use a good conditioner to keep your hair smooth and shiny.
Tips For Even Application
Always work in small sections. This ensures that the dye is evenly distributed.
Use a mirror to check the back of your head. This helps to avoid missing spots.
Apply the dye lightly at first. You can add more if needed. It is easier to add than to remove.
Make sure to blend the dye well. This avoids harsh lines and creates a natural look.
Practice makes perfect. Do not worry if your first attempt is not perfect. You will get better with time.
Balayage Technique
Want to give your hair a sun-kissed look without using foil? Try the balayage technique. This method creates natural highlights that blend seamlessly with your hair. No harsh lines or obvious streaks. Perfect for a soft, lived-in look.
Balayage Basics
Balayage means “to sweep” in French. The stylist uses a sweeping motion to paint the dye onto your hair. This technique focuses on the surface, leaving the underside darker. It gives your hair a multi-dimensional effect.
No need for foils or caps. The dye is freehand painted, allowing for more control and creativity. Balayage works well on all hair types and lengths. From short bobs to long waves, you can achieve a unique look.
Creating Natural-looking Highlights
Start with clean, dry hair. Section your hair into small parts. Mix your dye according to the instructions. Dip a brush into the dye and lightly sweep it over the top sections of your hair. Focus on the mid-lengths and ends for a natural look.
Blend well to avoid harsh lines. Use a comb to soften any strong edges. Let the dye sit for the recommended time, then rinse out. Condition well to keep your hair healthy and shiny. Enjoy your new, sun-kissed look!
Using A Highlighting Cap
Highlighting your hair at home can be fun. Using a highlighting cap makes the process easy and mess-free. This method doesn’t require foil and is ideal for beginners. Let’s explore how to use a highlighting cap.
Cap Selection
Choosing the right cap is important. Look for a highlighting cap with evenly spaced holes. This ensures even highlights. Some caps come with a hook. A hook helps pull hair through the cap.
Pulling Hair Through The Cap
First, wear the cap on dry, clean hair. Secure it snugly. Use the hook to pull small sections of hair through the holes. Pull hair evenly for uniform highlights. Work in sections to avoid missing spots. Once done, you’re ready to apply the bleach.
Aftercare Tips
So, you’ve taken the plunge and highlighted your hair at home without foil. Kudos! Now that you have those gorgeous, sun-kissed strands, it’s crucial to maintain them. Proper aftercare can make the difference between vibrant highlights and a dull disaster. Let’s dive into some essential aftercare tips to keep your highlights looking salon-fresh!
Maintaining Color
Keeping your highlights bright and beautiful is not as hard as you might think. Here are some simple tips:
- Use Color-Safe Shampoo and Conditioner: Regular shampoos can strip color. Opt for products designed for color-treated hair.
- Wash Less Often: Frequent washing can fade your highlights. Try to wash your hair two to three times a week.
- Cold Water Rinse: Rinsing with cold water helps to close the hair cuticle, locking in color and adding shine.
Avoiding Damage
Highlights can sometimes lead to dry and damaged hair if not taken care of properly. Here’s how to avoid that:
- Deep Conditioning Treatments: Use a deep conditioner once a week to keep your hair moisturized.
- Limit Heat Styling: Excessive use of hair dryers, straighteners, and curling irons can damage highlighted hair. Use heat protectant sprays if you must style.
- Trim Regularly: Regular trims prevent split ends and keep your hair looking healthy.
Remember that the little things you do every day can have a big impact on your hair’s health and appearance. Your new highlights are an investment, so take the time to care for them properly. Happy highlighting!

Credit: www.youtube.com
Troubleshooting Common Issues
So, you’ve decided to take the plunge and highlight your hair at home without foil. Kudos to you! It’s a fun, creative way to change up your look. But like any DIY project, it can come with its own set of challenges. Fear not! We’re here to help you troubleshoot the most common issues you might encounter. Let’s dive into some practical solutions to ensure your highlights turn out fabulous.
Fixing Uneven Color
Uneven color can be a real bummer, but it’s not the end of the world. Here are a few tips to get that gorgeous, even look:
- Apply color in small sections: This ensures the dye is evenly distributed. Divide your hair into small sections and apply the color methodically.
- Use a mirror: It’s hard to see the back of your head. Using a handheld mirror can help you check for any spots you may have missed.
- Blend with a comb: After applying the color, run a fine-tooth comb through your hair to blend the dye. This helps to spread the color more evenly.
- Correct with a toner: If the color is still uneven, a toner can help balance it out. Choose a toner that matches your desired shade and follow the instructions carefully.
Dealing With Over-processed Hair
Over-processed hair can feel dry, brittle, and prone to breakage. It’s essential to treat it with care. Here’s what you can do:
- Deep conditioning: Use a deep conditioning treatment or hair mask once a week. This will restore moisture and strength to your hair.
- Trim the ends: Regular trims help get rid of split ends and keep your hair healthy. Aim for a trim every 6-8 weeks.
- Avoid heat styling: Give your hair a break from the heat. If you must use heat tools, apply a heat protectant spray first.
- Use gentle products: Opt for sulfate-free shampoos and conditioners. These are less harsh and better for over-processed hair.
Remember, it’s all about patience and care. Your hair will thank you for the extra love and attention!
Credit: www.youtube.com
Frequently Asked Questions
What Can I Use Instead Of Foil For Highlights?
Use plastic wrap, balayage boards, or thermal strips as alternatives to foil for highlights. These options provide effective results.
How To Give Yourself Highlights Without Foil?
To give yourself highlights without foil, use a highlighting cap or freehand balayage technique. Apply the dye with a brush.
Can You Give Yourself Highlights With Box Dye?
Yes, you can give yourself highlights with box dye. Follow the instructions carefully and use a highlighting kit.
What Is The Easiest Way To Highlight Your Hair At Home?
Use a DIY highlighting kit. Follow instructions carefully. Apply highlights to small hair sections. Use a brush or cap method. Rinse and condition.
Can You Highlight Hair At Home Without Foil?
Yes, you can. Use a brush or comb to apply the dye.
Conclusion
Creating DIY hair highlights at home without foil is simple and fun. You can achieve beautiful, natural-looking highlights with easy techniques. Remember to gather all necessary supplies before starting. Practice patience and take your time for the best results. Always follow safety tips to protect your hair and skin.
With these steps, you can enjoy a fresh, new look without leaving home. Feel confident and stylish with your homemade highlights. Happy highlighting!