
If you’ve just got your Brother Label Maker PT H100, you might be wondering how to get started quickly and easily. You want clear, simple steps that help you create perfect labels without frustration.
This guide will walk you through the essential instructions so you can use your label maker like a pro. By the end, you’ll feel confident making labels for everything you need—whether it’s organizing your home, office, or personal items. Keep reading, and you’ll unlock the full potential of your Brother Label Maker PT H100 today.
Unboxing The Brother Pt H100
Opening the box of the Brother Pt H100 is the first step to using this handy label maker. It gives a good look at what you get and how ready the device is for use.
The unboxing experience shows the care put into packaging and the components included. This helps you understand the parts before starting your labeling tasks.
What’s Inside The Box
Inside the box, you find the Brother Pt H100 label maker itself. It comes with a power adapter to keep the device running. There is also a tape cassette for printing labels. A quick start guide is included to help with basic setup and use. Finally, you get a warranty card for service and support.
Initial Inspection
Check the label maker for any damage or defects before use. Make sure the tape cassette fits well and is not damaged. Look at the power adapter to ensure the cord is intact. Read through the quick start guide to understand the basic operations. Confirm that all items listed on the box are inside. This inspection ensures you start with a fully functional product.
Credit: www.ebay.com
Powering Up The Device
Powering up the Brother Label Maker PT-H100 is simple and quick. This step lets you start using the device right away. The label maker can run on batteries or use an AC adapter. Choose the method that fits your needs best.
Installing Batteries
Open the battery cover on the back of the device. Insert six AA batteries in the correct direction. Match the plus (+) and minus (–) signs inside the compartment. Close the cover firmly. The device will power on automatically or press the power button. Use new batteries for the best performance. Replace old batteries to avoid power issues.
Using The Ac Adapter
Plug the AC adapter into a power outlet. Connect the other end to the DC IN jack on the label maker. The device will power on automatically or press the power button. Using the adapter saves battery life. It is perfect for long labeling sessions. Always use the adapter that comes with the device. Avoid using adapters with different voltage or current ratings.
Loading Label Tape
Loading label tape into your Brother Label Maker PT H100 is a simple task. Proper loading ensures clear, sharp labels every time. Follow these steps carefully to avoid jams and errors.
Choosing The Right Tape
Select tape compatible with the PT H100 model. Use Brother-brand tapes for best results. Tape width should match the label maker’s specifications. Avoid low-quality tapes to prevent printing issues. Choose colors based on your labeling needs.
Inserting The Tape Cartridge
Open the tape compartment by lifting the cover. Place the tape cartridge inside with the tape end facing out. Make sure the tape feeds under the guide rollers. Close the cover gently until it clicks. Press the feed button to check tape movement.
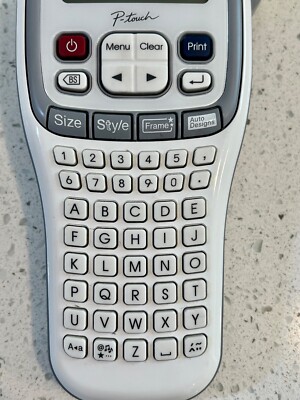
Basic Operations
The Brother Label Maker PT H100 is simple to use. Basic operations help you start and create labels fast. Knowing how to turn it on and off saves battery. Navigating the menu lets you find features quickly.
This section covers the essential steps to operate your label maker. It makes your labeling tasks easier and faster.
Turning On And Off
To turn on, press the power button once. The screen lights up, showing the main menu. To turn off, press the same button again. The device powers down to save energy.
Always turn off the label maker after use. It helps keep the battery life longer.
Navigating The Menu
Use the arrow keys to move through menu options. Up and down arrows scroll through choices. Left and right arrows change settings or go back.
Press the OK button to select an option. Use the Back button to return to the previous screen. The menu is easy to follow with clear labels.
Creating Your First Label
Starting your first label with the Brother Label Maker Pt H100 is simple. The device has a clear screen and easy buttons. You can make labels for folders, boxes, or anything else.
Follow a few easy steps to create a label that looks good and fits your needs. The process includes typing text, choosing font styles, and checking the label before printing.
Entering Text
Turn on the Brother Label Maker Pt H100. Use the keyboard to type the words you want on your label. Use simple words and short phrases for clear labels. The screen shows the text as you type, so you can see your work.
Adjusting Font And Size
Press the font button to change the style of your text. Choose from options like bold, italic, or underline. Next, press the size button to pick a size. Select small, medium, or large to fit your label space.
Previewing The Label
Before printing, press the preview button. This shows your label on the screen. Check for any mistakes or changes you want. If everything looks right, you are ready to print your label.

Credit: www.ifixit.com
Advanced Label Settings
The Brother Label Maker PT-H100 offers advanced label settings that enhance your labeling experience. These features help you create unique, clear, and professional labels. You can customize labels by adding symbols, frames, and even barcodes. These options make your labels stand out and serve different purposes.
Adding Symbols And Frames
Adding symbols is simple with the PT-H100. Press the symbol key to browse a variety of icons. Choose the one that fits your label’s purpose. Frames add a decorative border around your text. Use the frame button to select from different styles. Frames make your labels look neat and eye-catching. Combining symbols and frames helps highlight important information.
Using Barcode Features
The PT-H100 supports barcode printing for easy scanning. Select the barcode option from the menu. Enter the numbers or letters you want to encode. Choose the barcode type that fits your needs, like CODE39 or EAN13. The label maker generates a clear barcode on your label. Barcodes help with organization, inventory, and tracking tasks.
Printing And Cutting Labels
Printing and cutting labels with the Brother Label Maker PT H100 is simple and quick. This device helps create neat labels for home, office, or school. Follow the steps carefully to get the best results every time.
Understanding how to start the print and use the cutting options is key. The machine offers both manual and automatic cutting for convenience and precision. Let’s explore these functions in detail.
Starting The Print
Turn on your Brother PT H100 label maker first. Enter the text you want on your label. Check the screen to make sure everything looks right. Press the “Print” button to begin printing. The label will start coming out of the machine. Watch to ensure the text prints clearly and fully.
Manual And Automatic Cutting
After printing, the label needs to be cut. The Brother PT H100 offers two cutting methods: manual and automatic. For manual cutting, press the cutter button. The blade will cut the label where you want. This option gives more control over label length.
Automatic cutting happens after printing finishes. The machine cuts the label by itself at the right spot. This method saves time and is perfect for many labels at once. Choose the cutting style that fits your needs for clean and tidy labels every time.
Troubleshooting Common Issues
Troubleshooting common issues with the Brother Label Maker Pt H100 helps keep your device working smoothly. Small problems can stop your work or slow you down. Fixing these issues quickly saves time and frustration.
Tape Jams
Tape jams happen when the tape gets stuck inside the machine. Open the tape cover gently. Remove the tape cartridge carefully. Check for any torn tape pieces inside. Clear the jam by pulling out stuck tape slowly. Reinsert the cartridge and close the cover firmly. Test the printer by printing a label. Repeat if needed.
Low Battery Warnings
The Brother Pt H100 shows low battery warnings to save power. Replace the batteries with new ones of the correct type. Use fresh alkaline batteries for best results. Remove the battery cover to change them. Make sure the batteries fit properly with correct polarity. Close the cover tightly. Turn on the device and check the display. The warning should disappear.
Print Quality Problems
Print quality can drop if the tape or print head is dirty. Wipe the print head gently with a soft cloth. Use a little rubbing alcohol on the cloth if needed. Check the tape cartridge for damage or dirt. Replace the tape if it looks worn out. Adjust the print settings to match your tape type. Test print a label to see if quality improves.
Maintenance Tips
Proper maintenance keeps your Brother Label Maker PT-H100 working well. Regular care helps avoid common issues. Follow these simple steps to extend its life and keep labels clear.
Cleaning The Print Head
Dirty print heads cause blurry labels. Turn off the device before cleaning. Use a soft cloth slightly dampened with water. Gently wipe the print head to remove dust and residue. Avoid harsh chemicals or rough materials. Clean every few weeks for the best print quality.
Storing The Label Maker
Store your label maker in a cool, dry place. Avoid direct sunlight or heat sources. Keep it away from dust and moisture. Use the protective cover if available. Remove the batteries if you will not use it for a long time. Proper storage prevents damage and keeps it ready for use.

Credit: www.amazon.com
Accessories And Extras
The Brother Label Maker PT-H100 offers useful accessories and extras. These items help improve your labeling experience. They make your tasks easier and more organized.
Compatible Tapes
The PT-H100 works with TZe tapes. These tapes come in many colors and sizes. Choose from different widths to fit your needs. The tapes are easy to load and replace. They provide clear, long-lasting labels. Use laminated tapes for extra durability. Perfect for home, office, or school use.
Carrying Cases
Carrying cases protect your label maker. They keep the device safe during travel. Cases often have extra pockets for tapes and batteries. Choose a case with soft padding for better protection. A compact case helps keep everything together. Makes it easy to carry your label maker anywhere.
Frequently Asked Questions
How Do I Load Tape Into The Brother Pt H100?
Open the tape cover, insert the tape cassette correctly, then close the cover securely.
How Can I Print Labels With Different Fonts On Pt H100?
Use the menu to select font style before typing your label text.
What Should I Do If The Label Maker Jams?
Turn off the device, carefully remove the tape, then restart the label maker.
How Do I Change The Battery In Brother Pt H100?
Open the battery cover, remove old batteries, insert new ones matching polarity.
Can I Connect Brother Pt H100 To A Computer?
No, the PT H100 model does not support computer connectivity.
Conclusion
The Brother Label Maker Pt H100 is easy to use with clear steps. Follow the instructions carefully to create neat labels quickly. Practice a few times to get comfortable with the buttons. This tool helps organize your home or office simply and fast.
Keep your labels tidy and easy to read. Enjoy the convenience this label maker brings every day.