
Are you looking to save space and add style to your room? Building a DIY Murphy bed and bookcase might be the perfect solution for you.
Imagine having a comfortable bed that folds away effortlessly, revealing a beautiful bookcase that keeps your favorite reads within reach. This clever setup not only frees up your floor space but also adds a unique touch to your home. In this guide, you’ll discover simple steps and helpful tips to create your own Murphy bed and bookcase, even if you’ve never built furniture before.
Ready to transform your room and impress your friends? Let’s get started!

Credit: www.youtube.com
Choosing The Right Space
Choosing the right space is the first step in building a DIY Murphy bed and bookcase. The space must fit the bed’s size and allow easy use. It should also blend well with your room’s style and function.
Careful planning helps avoid problems later. Consider the room’s size, wall type, floor strength, and lighting. Good choices make the project smooth and the final product useful and attractive.
Measuring Your Room
Measure the room’s length, width, and height. Note any obstacles like doors, windows, or vents. Use a tape measure and record all numbers clearly. Accurate measurements ensure the bed fits perfectly and opens safely.
Check the space where the bed will fold down. Allow extra room for movement. Avoid tight spots that block walking or other furniture.
Selecting Wall And Floor
Choose a strong wall to support the bed. Stud walls are best for mounting heavy furniture. Use a stud finder to locate solid spots behind drywall.
Floor strength matters too. The bed and bookcase can be heavy. Avoid weak or uneven floors that may cause damage or instability.
Considering Lighting And Ventilation
Good lighting makes the space inviting and safe. Natural light is ideal but add lamps or ceiling lights if needed. Avoid placing the bed under harsh or direct light.
Ventilation keeps the room fresh and comfortable. Ensure windows or vents allow air flow. Avoid tight, stuffy corners that trap heat or moisture.
Planning The Design
Planning the design is the first step to build a DIY Murphy bed and bookcase. This stage helps create a clear vision for your project. It ensures the bed fits your space and matches your style. Careful planning saves time and avoids mistakes during building.
Deciding Bed Size
Choose the right bed size for your needs. Measure the room to see what fits best. Common sizes include twin, full, and queen. Think about who will use the bed most often. A smaller bed saves space. A larger bed offers more comfort. Make sure the bed fits easily when folded up.
Incorporating Bookcase Features
Plan the bookcase to add storage and style. Decide how many shelves you want. Think about shelf height for books and decor. Consider closed cabinets for hidden storage. Make the bookcase sturdy to hold heavy items. The bookcase should blend well with the bed design. Use it to keep your room organized and neat.
Selecting Materials
Pick materials that are strong and easy to work with. Common choices include plywood, MDF, and solid wood. Plywood is durable and resists warping. MDF is smooth and easy to paint. Solid wood looks natural but costs more. Choose hardware like hinges and lifts that support weight safely. Match materials to your budget and skills. Proper materials ensure your bed and bookcase last long.
Gathering Tools And Materials
Building a DIY Murphy bed and bookcase starts with gathering the right tools and materials. This step sets the foundation for a smooth project. Having everything ready saves time and avoids frustration.
Prepare all items before starting. It helps keep the work organized and efficient. Let’s explore the essential tools, best wood types, and needed hardware for this project.
Essential Tools List
Collect these tools for an easier build:
- Electric drill with bits
- Measuring tape
- Level
- Clamps
- Circular saw or handsaw
- Screwdrivers
- Stud finder
- Hammer
- Wood glue
- Sandpaper or power sander
Recommended Wood Types
Choose wood that is sturdy and smooth. Common options include:
- Pine: Affordable and easy to work with
- Birch plywood: Strong and looks nice
- Maple: Durable with a fine grain
- Oak: Hard and long-lasting
Select wood with a thickness of at least 3/4 inch. It supports weight and lasts longer.
Hardware And Accessories
Hardware is key for function and safety. Important items include:
- Murphy bed hardware kit (hinges and springs)
- Screws and bolts
- Drawer slides (for bookcase shelves)
- Handles or knobs
- Wall anchors
- Safety straps or locks
Check that all parts fit your bed size and design.

Credit: www.reddit.com
Building The Murphy Bed Frame
Building the Murphy bed frame is the most important step in your DIY project. This frame holds the mattress and allows the bed to fold up and down smoothly. Strong materials and precise construction are key to making a durable bed frame. Follow these steps carefully to ensure your Murphy bed works well and lasts for years.
Constructing The Bed Platform
Start by cutting the wood to the exact size of your mattress. Use plywood or hardwood for a strong platform. Join the pieces with screws and wood glue for extra strength. Make sure the platform is flat and smooth. Sand the edges to avoid splinters. This platform will support the mattress evenly.
Installing Hinges And Supports
Attach heavy-duty hinges to connect the bed platform to the frame. Use metal hinges designed for lift-up beds. Position the hinges so the bed can fold up into the wall or bookcase. Add support arms or springs to help lift the bed easily. Test the movement several times to ensure smooth operation. Secure all screws tightly to avoid wobbling.
Ensuring Stability And Safety
Check the frame for any loose parts or gaps. Add corner braces for extra strength. Use locking mechanisms to keep the bed in place when folded up. Make sure the bed frame stays stable during use. Test the bed by placing weight on it. Safety comes first in any DIY Murphy bed project.
Creating The Bookcase Structure
Creating the bookcase structure is a key step in building your DIY Murphy bed and bookcase. This part holds everything together and adds useful storage space. A strong frame and well-made shelves make the bookcase sturdy and functional.
Start with careful measurements and select quality wood for durability. The design should fit your room size and match the bed frame perfectly. This section explains how to build shelves, attach the bookcase to the bed frame, and finish the project.
Building Shelves And Compartments
Cut wood panels to size for shelves and dividers. Use a level and square to ensure straight lines. Attach shelves with screws or wood glue for strong joints. Create compartments of different sizes to hold books and decor items. Sand edges smooth to avoid splinters. This step shapes the bookcase’s storage space clearly and neatly.
Attaching Bookcase To Bed Frame
Align the bookcase frame with the Murphy bed’s side panels. Use metal brackets and screws to secure the bookcase firmly. Check that both parts move together without gaps or wobbling. Reinforce corners with corner braces for added strength. This step ensures the bookcase and bed frame work as one solid unit.
Finishing Touches
Fill holes and cracks with wood filler and sand until smooth. Apply paint or stain to match your room’s style. Add knobs or handles to shelves for easy access. Attach rubber pads under the base to protect the floor. These final steps improve appearance and protect your bookcase for long use.
Painting And Finishing
Painting and finishing your DIY Murphy bed and bookcase is an important step. It protects the wood and gives your furniture a polished look. Taking time to prepare the surface and choose the right finish helps your project last longer. A smooth, even finish also makes your Murphy bed and bookcase look professional and neat.
Sanding And Priming
Start by sanding all wood surfaces with fine-grit sandpaper. This removes rough spots and helps paint stick better. Wipe off dust with a clean cloth after sanding. Apply a primer to seal the wood and create a smooth base. Use a brush or roller for even coverage. Let the primer dry fully before painting or staining.
Choosing Paint Or Stain
Pick paint or stain based on your style and wood type. Paint covers the wood and offers many color choices. Stain shows the wood grain and adds natural warmth. Use water-based paint for easy cleanup and low odor. For stain, apply with a cloth or brush, wiping off extra. Test your color on a scrap piece first to ensure satisfaction.
Sealing And Protecting
Apply a clear sealer or varnish to protect your finish. This guards against scratches, moisture, and daily wear. Use a polyurethane or acrylic sealer for strong protection. Apply thin coats with a clean brush and let each dry well. Lightly sand between coats for a smooth surface. Proper sealing keeps your Murphy bed and bookcase beautiful for years.
Installing The Murphy Bed And Bookcase
Installing the Murphy bed and bookcase is a critical step. It secures the furniture and ensures safety. Proper installation allows smooth use every day. Follow each step carefully for a solid setup.
Mounting To The Wall
Start by finding wall studs using a stud finder. Mark the spots clearly for drilling. Use heavy-duty anchors or screws suited for your wall type. Secure the bed frame and bookcase firmly to the wall. This prevents tipping and adds stability. Double-check that the frame is level before tightening screws.
Testing Mechanism
After mounting, test the bed’s lift mechanism. Pull the bed down slowly to check movement. Ensure it opens without resistance or noise. Push the bed back up carefully to test closing. The mechanism should hold the bed securely in place. Repeat the test a few times for safety.
Adjusting For Smooth Operation
If the bed feels heavy or sticks, adjust the springs. Tighten or loosen bolts as needed for balance. Lubricate moving parts with a light oil for smooth action. Make sure the bookcase doors open freely without obstruction. Small tweaks improve comfort and extend the furniture’s life.
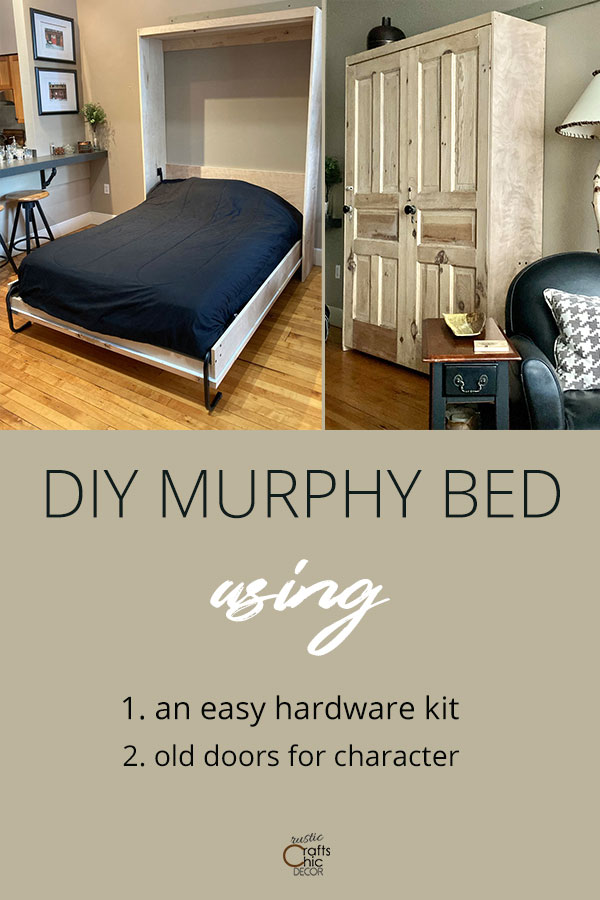
Credit: rustic-crafts.com
Maintaining Your Space-saver
Maintaining your DIY Murphy bed and bookcase keeps it working well and looking great. Regular care makes your space-saver last longer. It also helps avoid common problems. Small steps now save time and money later. Follow these tips to keep your setup smooth and safe.
Regular Cleaning Tips
Dust your Murphy bed and bookcase weekly. Use a soft cloth to avoid scratches. Clean hard-to-reach spots with a small brush. Wipe away spills immediately to prevent stains. Avoid harsh chemicals that can damage the finish. Keep the area around it free from dirt and debris.
Checking Hardware
Inspect all screws, bolts, and hinges often. Tighten any loose parts carefully. Look for signs of rust or wear on metal pieces. Replace damaged hardware right away. Test the bed’s lifting mechanism to ensure smooth operation. Proper hardware care prevents accidents and damage.
Troubleshooting Common Issues
If the bed doesn’t fold smoothly, check for obstructions. Lubricate moving parts with a light oil. Listen for unusual noises that might signal problems. If the bookcase shelves wobble, reinforce them with extra support. Address issues quickly to avoid bigger repairs. Keep your space-saver safe and reliable.
Frequently Asked Questions
What Tools Do I Need To Build A Diy Murphy Bed And Bookcase?
Basic tools include a drill, screwdriver, measuring tape, saw, level, and clamps for accurate assembly.
How Much Space Is Needed For A Murphy Bed And Bookcase?
A wall space of about 7 feet wide and 8 feet high works well for most Murphy beds.
Can I Build A Murphy Bed Without Professional Help?
Yes, clear instructions and simple tools make it possible for beginners to build one themselves.
How Do I Ensure The Bed Frame Is Safe And Sturdy?
Use strong wood, secure all joints tightly, and install proper bed hardware for safety.
What Materials Are Best For A Diy Murphy Bed And Bookcase?
Plywood or hardwood offer durability and a smooth finish, ideal for building both parts.
Conclusion
Building a DIY Murphy bed and bookcase saves space and adds style. The steps are clear and easy to follow. You only need basic tools and materials. Take your time and measure carefully. This project fits small rooms or guest spaces well.
Enjoy your new furniture that combines comfort and function. It’s a smart way to use your room better. Now, you can relax and admire your handiwork. Simple, useful, and made by you.